glpg80
Well-known member
I’m documenting my journey to take an already modified (poorly), for parts 1974 Marshall Superlead MKII and restoring it with all of the creature comforts of a modern amplifier.
The amplifier landed in my hands with the original board already swapped out and the original faceplate stolen along with it. This amplifier had its board and faceplate transplanted from what seems like a late 70’s JMP master volume board.
It has the original dagnall iron.
The JMP has received extensive tonal modifications which sound stellar and will remain. It’s already modified well beyond turning back to stock and I also prefer the master volume 2203 platform.
The mod list outlined below is what is described:
Design and fabricate a dual bias control board separate from stock that is more efficient and safer than the original design. The board was designed and simulated in LTSpice.
Install a metroloop with footswitchable bypass.
True dual master volumes that are footswitchable.
Install a global resonance control.
Modify the chassis to accept and install a modern Marshall 15A rated impedance selector for safety of the OT.
Replace the incorrectly installed fuse holders.
Replace the damaged pilot light.
Make the Hi/Lo input footswitchable. The design must allow for override for HI or LO input by the user when the footswitch is unplugged.
Design and fabricate the relay control board.
Modify a replacement Marshall 3 button footswitch to control the functions.
Install a dedicated 12.9V DC supply.
Convert the preamp section to DC heaters
Float the power tubes on 12VDC.
Repair a vented original Daly capacitor by recapping the entire amplifier. Repair and replace the damaged and corroded control switches due to the vented Daly capacitor. Clean the chassis.
New preamp tube sockets to replace the worn and damaged originals.
Replace all damaged or compromised wiring. Whoever did the previous work was a hack and the soldering iron compromised the shielding to a lot of wires.
Full retube.
Laminate the ID tag and reinstall to the chassis to prevent further damage from age.
Replace the headshell with a purple headshell. Use the original hardware.
Replace the faceplate with a period correct 4 hole input faceplate.
After all is said and done, I hope to have the best of both worlds. A Marshall that is true to its tone yet complete with all of the functions to make it gig friendly in our modern world while also being reliable with the decreased load on the PT.
Cheers as I walk you along this journey and I hope you enjoy my build.
The original post:
————————————————————————————————————————————————————
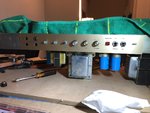
This thing is a mess. Just ordered new fuse holders because some dip decided it would be a good idea to use rubber cement on the original ones because they couldn't find the correct nut for the inside.
Cord was incorrectly spliced and the shielding had broken where the strain relief existed which is a hazard.
Caps were leaking and beyond need for replacement
So far I've got the caps on hand and have replaced the indicator light which was broken and superglued by the same dumbass. It too was also incorrectly spliced.
I've pulled so much electrical tape and just junk wiring out of this amp that I had to order more wire on hand.
Can't wait until I can get all of these remedial repairs completed and actually start doing fun mods.

The amplifier landed in my hands with the original board already swapped out and the original faceplate stolen along with it. This amplifier had its board and faceplate transplanted from what seems like a late 70’s JMP master volume board.
It has the original dagnall iron.
The JMP has received extensive tonal modifications which sound stellar and will remain. It’s already modified well beyond turning back to stock and I also prefer the master volume 2203 platform.
The mod list outlined below is what is described:
Design and fabricate a dual bias control board separate from stock that is more efficient and safer than the original design. The board was designed and simulated in LTSpice.
Install a metroloop with footswitchable bypass.
True dual master volumes that are footswitchable.
Install a global resonance control.
Modify the chassis to accept and install a modern Marshall 15A rated impedance selector for safety of the OT.
Replace the incorrectly installed fuse holders.
Replace the damaged pilot light.
Make the Hi/Lo input footswitchable. The design must allow for override for HI or LO input by the user when the footswitch is unplugged.
Design and fabricate the relay control board.
Modify a replacement Marshall 3 button footswitch to control the functions.
Install a dedicated 12.9V DC supply.
Convert the preamp section to DC heaters
Float the power tubes on 12VDC.
Repair a vented original Daly capacitor by recapping the entire amplifier. Repair and replace the damaged and corroded control switches due to the vented Daly capacitor. Clean the chassis.
New preamp tube sockets to replace the worn and damaged originals.
Replace all damaged or compromised wiring. Whoever did the previous work was a hack and the soldering iron compromised the shielding to a lot of wires.
Full retube.
Laminate the ID tag and reinstall to the chassis to prevent further damage from age.
Replace the headshell with a purple headshell. Use the original hardware.
Replace the faceplate with a period correct 4 hole input faceplate.
After all is said and done, I hope to have the best of both worlds. A Marshall that is true to its tone yet complete with all of the functions to make it gig friendly in our modern world while also being reliable with the decreased load on the PT.
Cheers as I walk you along this journey and I hope you enjoy my build.
The original post:
————————————————————————————————————————————————————
This thing is a mess. Just ordered new fuse holders because some dip decided it would be a good idea to use rubber cement on the original ones because they couldn't find the correct nut for the inside.
Cord was incorrectly spliced and the shielding had broken where the strain relief existed which is a hazard.
Caps were leaking and beyond need for replacement
So far I've got the caps on hand and have replaced the indicator light which was broken and superglued by the same dumbass. It too was also incorrectly spliced.
I've pulled so much electrical tape and just junk wiring out of this amp that I had to order more wire on hand.
Can't wait until I can get all of these remedial repairs completed and actually start doing fun mods.
Last edited: